Managing multiple bills for a single purchase order is a common scenario in many businesses. Whether you use the NetSuite UI, API, or SuiteScript, NetSuite has a bunch of options to help you streamline this process.
In this guide, we’ll explore how to match a single purchase order to multiple vendor bills, using each of these methods. We’ll also discuss the limitations of certain methods (like NetSuite’s REST API) compared to the SOAP API.
Towards the end, we’ll also look at how you can automate this process using AI-enabled end-to-end workflow automation.
Matching a PO to Multiple Vendor Bills on the NetSuite UI
Using the NetSuite UI to match a single purchase order (PO) to multiple vendor bills is a straightforward task, ideal for smaller operations or businesses that don’t need automation. This method allows you to create bills for different line items on a PO or for partial quantities of items.
Step-by-Step Instructions:
- Access the Purchase Order:
- Navigate to Transactions > Purchases > Enter Purchase Orders to locate the PO you want to match.
- Create a Vendor Bill:
- Go to Transactions > Payables > Enter Vendor Bills, and select the relevant PO number. This links the bill to the PO. You will see the available quantities that can be billed.
- Enter Vendor Bill Details:
- Fill in the bill details, including line items or quantities that need to be billed. Save the bill after ensuring that the quantities do not exceed the ordered amounts.
- Repeat for Additional Vendor Bills:
- If the PO requires multiple bills, repeat the process, selecting the remaining items or quantities on the PO.
Matching a Single PO to Multiple Vendor Bills Using the API
NetSuite provides both SOAP and REST APIs (these are 2 different API technologies that are commonly used by developers). While the SOAP API is older and more mature, it can also be slow in performance. The NetSuite REST API is more modern (it was introduced in 2019 by Oracle) but doesn’t have the extensive support and customisation capabilities that the SOAP API has.
If this is the first time you’re using APIs with NetSuite, you might want to refer to this article where we guide you through the API setup and help you create your first vendor bill in NetSuite.
For this article, we’ll use the example of the SOAP API to do the PO matching with Vendor Bills.
Step-by-Step Instructions:
- Retrieve the Purchase Order Record:
<get>
    <baseRef internalId="PO_ID" type="purchaseOrder"/>
</get>- First, retrieve the details of the purchase order using the
getoperation. This provides access to the PO’s line items, quantities, and remaining quantities. - Create Vendor Bill for First Bill:
<add>
    <record xsi:type="VendorBill">
        <entity internalId="VENDOR_ID"/>
        <purchaseOrderList>
            <purchaseOrder internalId="PO_ID"/>
        </purchaseOrderList>
        <!-- Item details go here -->
    </record>
</add>- Use the
addoperation to create a vendor bill for the first set of line items or quantities from the PO.
Repeat for Additional Vendor Bills:
- Repeat the process to add more bills, adjusting the line items and quantities for each vendor bill.
SOAP API Benefits:
- Supports Saved Searches: This is a major advantage over the REST API provided by Oracle. You can retrieve exactly the data you need in one API call, reducing the complexity of multiple joins.
- File Cabinet Support: SOAP allows you to access files in the File Cabinet, which can be important when bills require attached documents.
- Stable and Robust: Despite being older, the SOAP API has a well-documented, stable structure with extensive support.
SOAP API vs REST API: Key Differences for Matching POs to Vendor Bills
We’ll go into a little more detail since this is something that often comes up in NetSuite development – what is the difference, really, between these two types of APIs given by Oracle?
SOAP API:
- Authentication: SOAP uses Token-Based Authentication (TBA), which is OAuth1-based. Though older, it is well-supported in enterprise settings and relatively easy to configure.
- Metadata Handling: SOAP handles standard entities and fields well but struggles with custom fields without additional workarounds.
- Saved Searches and File Cabinet: SOAP provides built-in support for saved searches and file cabinet operations, making it the preferred choice for complex data retrieval tasks.
- Performance: SOAP is slow (but stable) and ideal for large, complex integrations, though the syntax is more verbose and challenging compared to REST.
💡
1. If you’re doing large-scale or complex integrations that will almost certainly involve non-standard operations, file movement and so on
2. For any self-serve deployments (since the documentation is extensive, and there is a history of successful integrations done by others)
REST API:
- Authentication Flexibility: REST supports OAuth2 in addition to TBA. However, OAuth2 in NetSuite has some caveats, such as frequent token expirations for the Authorization Code Grant method.
- Metadata Handling: REST allows for more dynamic access to metadata, making it useful for environments where entity structures change frequently. REST also supports OpenAPI schemas, including for custom fields.
- SuiteQL Support: REST includes support for SuiteQL, which can significantly simplify complex queries by allowing SQL-like queries via the API.
- Limitations: REST is still relatively new in NetSuite, and many records are still in beta. Critical functions like saved searches and file cabinet access require workarounds, such as custom Restlets.
💡
1. For faster and small-scale deployments, where you are mostly working with standard objects (like customer, salesOrder, invoice and so on).
2. For cases where OAuth2 is mandated by the client’s authentication requirements
Matching a Single PO to Multiple Vendor Bills Using SuiteScript
For companies that require a highly customized solution, SuiteScript provides a powerful JavaScript-based scripting platform to match purchase orders with multiple vendor bills. SuiteScript allows full control over workflows and is more useful in cases where customization is important.
Step-by-Step Instructions:
- Load the Purchase Order:
var poRecord = record.load({
    type: record.Type.PURCHASE_ORDER,
    id: 'PO_ID'
});- Use SuiteScript’s
record.loadmethod to access the purchase order.
2. Create the Vendor Bill:
var vendorBill = record.create({
    type: record.Type.VENDOR_BILL,
    isDynamic: true
});

vendorBill.setValue({
    fieldId: 'entity',
    value: VENDOR_ID
});

// Select lines from the purchase order
vendorBill.selectNewLine({
    sublistId: 'item'
});

vendorBill.setCurrentSublistValue({
    sublistId: 'item',
    fieldId: 'purchaseorder',
    value: 'PO_ID'
});

vendorBill.commitLine({
    sublistId: 'item'
});
vendorBill.save();- Create a vendor bill record using
record.create. Select the appropriate line items from the PO and map them to the vendor bill.
3. Repeat for Multiple Bills:
- Use this logic to create additional vendor bills by selecting remaining PO lines in subsequent script executions.
Advantages of SuiteScript:
- Full Customization: SuiteScript offers total control over the process, making it perfect for unique billing workflows.
- Extensibility: You can easily build on the script to handle other custom needs like validation, logging, or error handling.
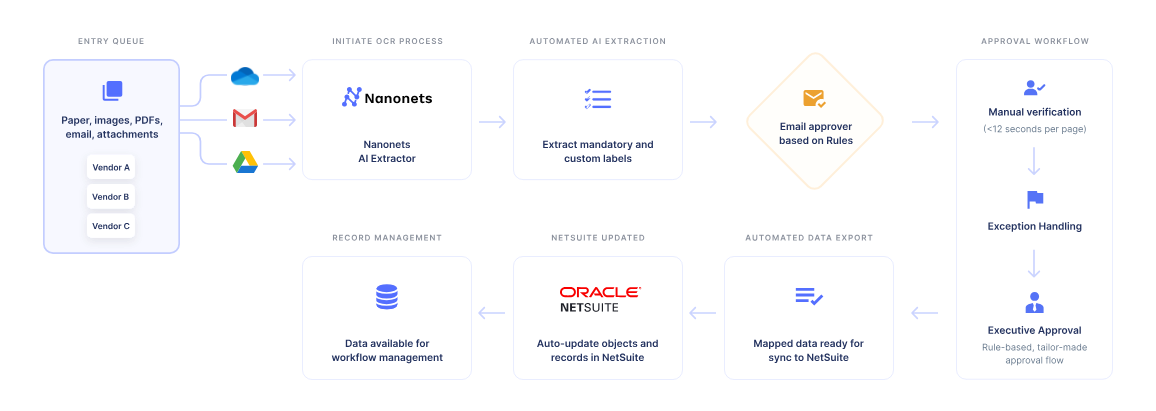
Using end-to-end Workflow Automation Software to Match POs to Invoices
If you’re using NetSuite to run your finances and CRM operations, it’s quite likely you’re already running a production deployment of NetSuite, and all your workflows are set up and being used daily.
In such a scenario, it might be easier to work with an integration partner who can migrate your processes and automate a production environment, without you having to get into the messy details of API integrations and SuiteQL queries.
Using AI automation like Nanonets has a few advantages:
Interested in learning more? A short 15-minute intro call with an automation expert is the best way to get started.
Conclusion
Matching a purchase order to multiple vendor bills in NetSuite can be handled in several ways, depending on your business setup. You can go for something that is more manual and gives you more control, or you can fully automate it using the API (with significantly higher effort and some coding involved).
By combining the best of both worlds using a no-code solution like Nanonets, you can confidently manage vendor item codes, streamline data entry, and reduce manual errors, saving valuable time for your procurement and finance teams.
References: