Whether you’re getting started with your custom NetSuite deployment, or just using NetSuite to run your AP process, one of the most common tasks you’ll do is creating vendor bills.
Manually creating vendor bills can be a pain – the NetSuite UI is not very straightforward, and there are hidden complexities (and some really cool features) that are present only in the API and not on the NetSuite app.
However, the complexity of the NetSuite API can be overwhelming. It takes a lot of dedicated time (and effort) to set up an API integration and actually automate your NetSuite workflows.
That’s where Nanonets comes in, providing a plug-and-play integration with NetSuite that eliminates the hassle and confusion, making vendor bill automation effortless.
Nanonets automates vendor bill entry into NetSuite, and sets up seamless 2-way and 3-way matching in less than 15 minutes!
But before we get too far ahead of ourselves, let’s first understand how to set up the NetSuite API and create vendor bills with ease.
Understanding Vendor Bills in NetSuite
A Vendor Bill is a record used to track the costs incurred when purchasing products or services from a supplier. In NetSuite, vendor bills are critical for financial and accounting purposes, helping businesses streamline payments and manage inventory effectively. These records also serve as a source for tracking outstanding amounts due to suppliers.
Depending on the nature of your transactions, you may need to create different types of vendor bills.
- Expense-based Vendor Bills: These bills are used for recording general expenses like utilities, rent, or services. No physical items are associated with these bills.
- Item-based Vendor Bills: These bills involve tangible goods or inventory purchased from the vendor. This type of bill can include line items for each product or service.
Furthermore, both Expense-based and Item-based Vendor bills can be classified into below 2 main groups depending on whether they are linked to a purchase order or not.
- Standalone Vendor Bills: These bills are independent and not linked to any Purchase Orders (POs). They are typically used for ad-hoc purchases or services.
- Vendor Bills Matching Purchase Orders: These bills correspond to existing POs, ensuring that the billing matches what was ordered.
Setting up the NetSuite API
Before you can start creating vendor bills using the NetSuite API, you’ll need to set up your account access and ensure proper authentication. Here’s how you can do it:
Obtain Account Credentials:
- Log in to your NetSuite account.
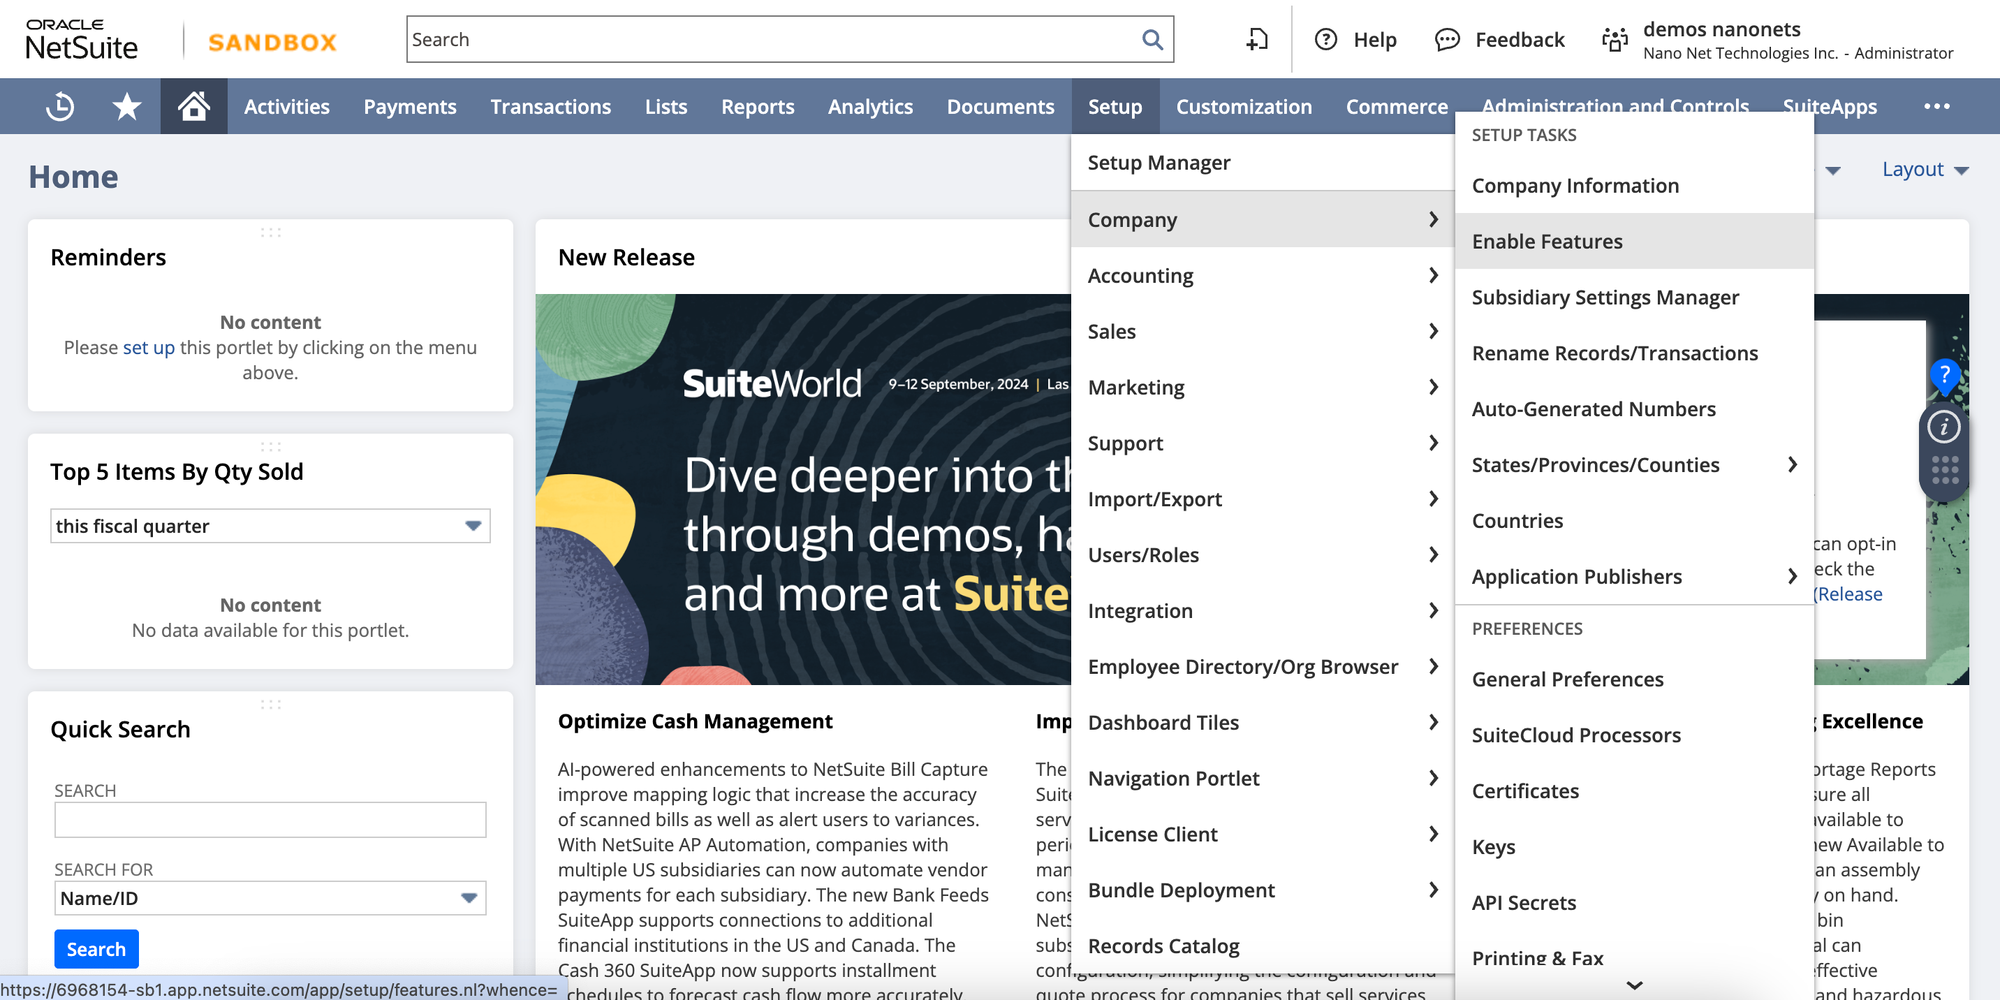
- Navigate to Setup > Company > Enable Features.
- Under the SuiteCloud tab, ensure that SOAP Web Services and Token-Based Authentication are enabled.
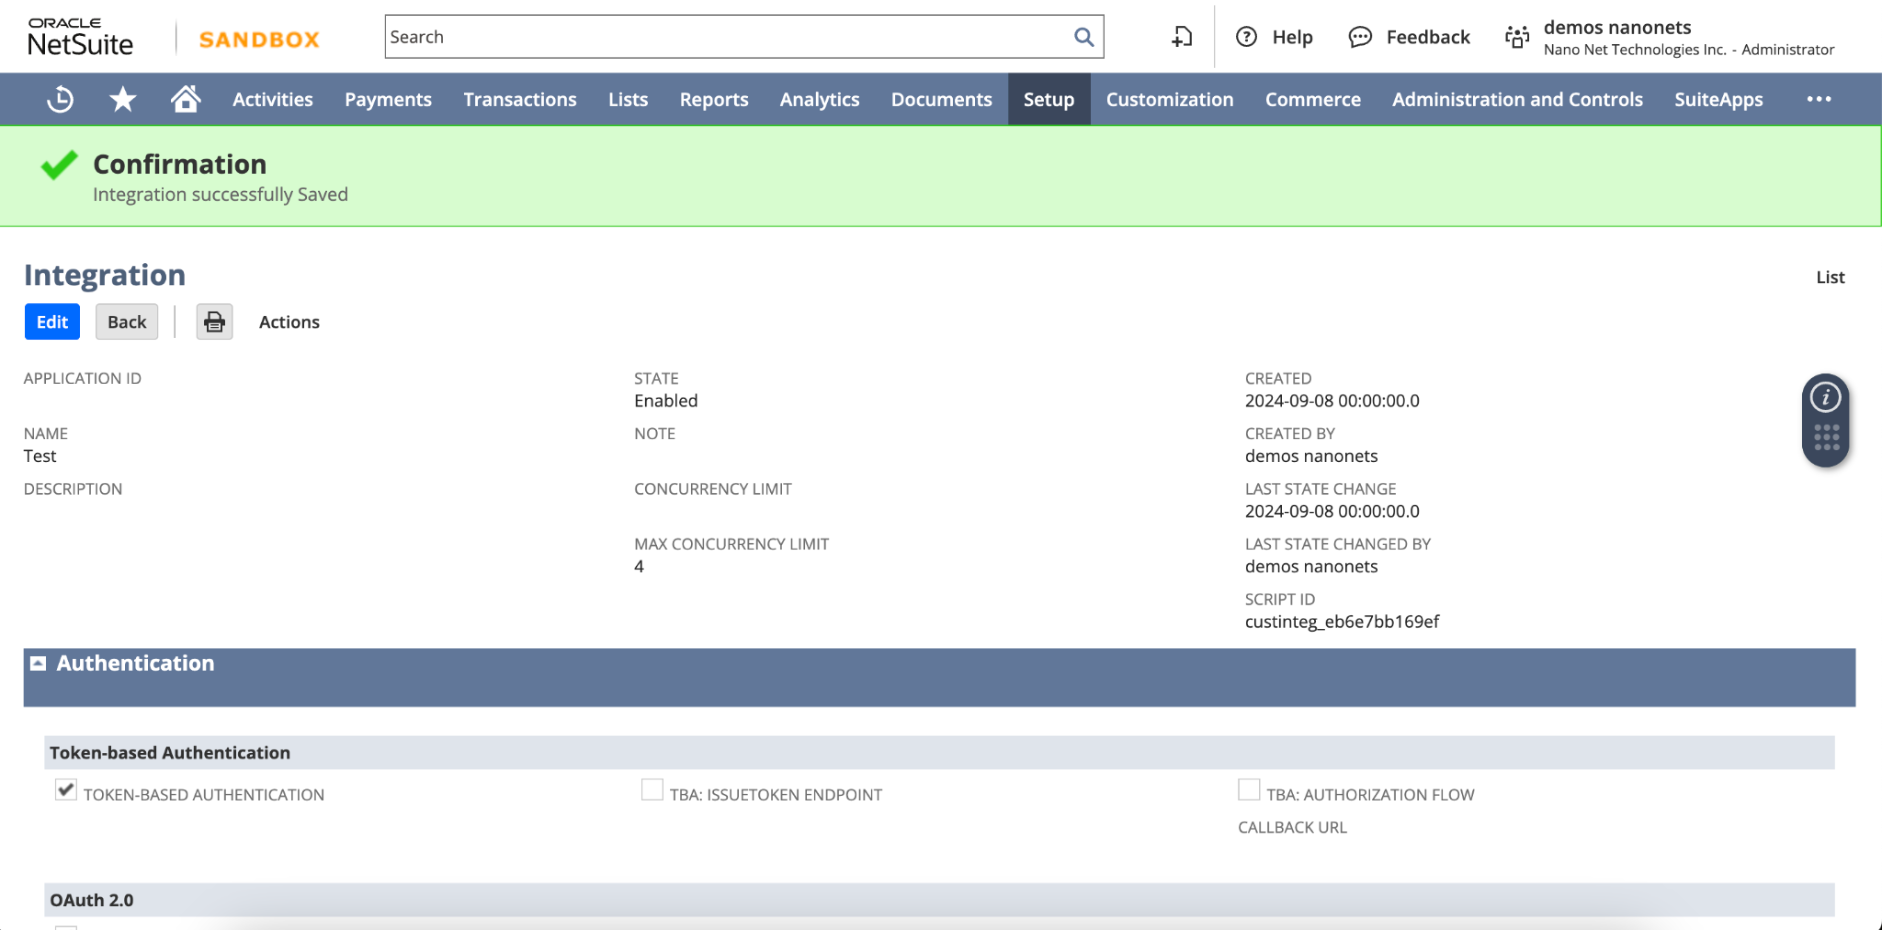
Create an Integration Record:
- Go to Setup > Integration > Manage Integrations > New.
- Fill out the required fields, and note down the Consumer Key and Consumer Secret provided.
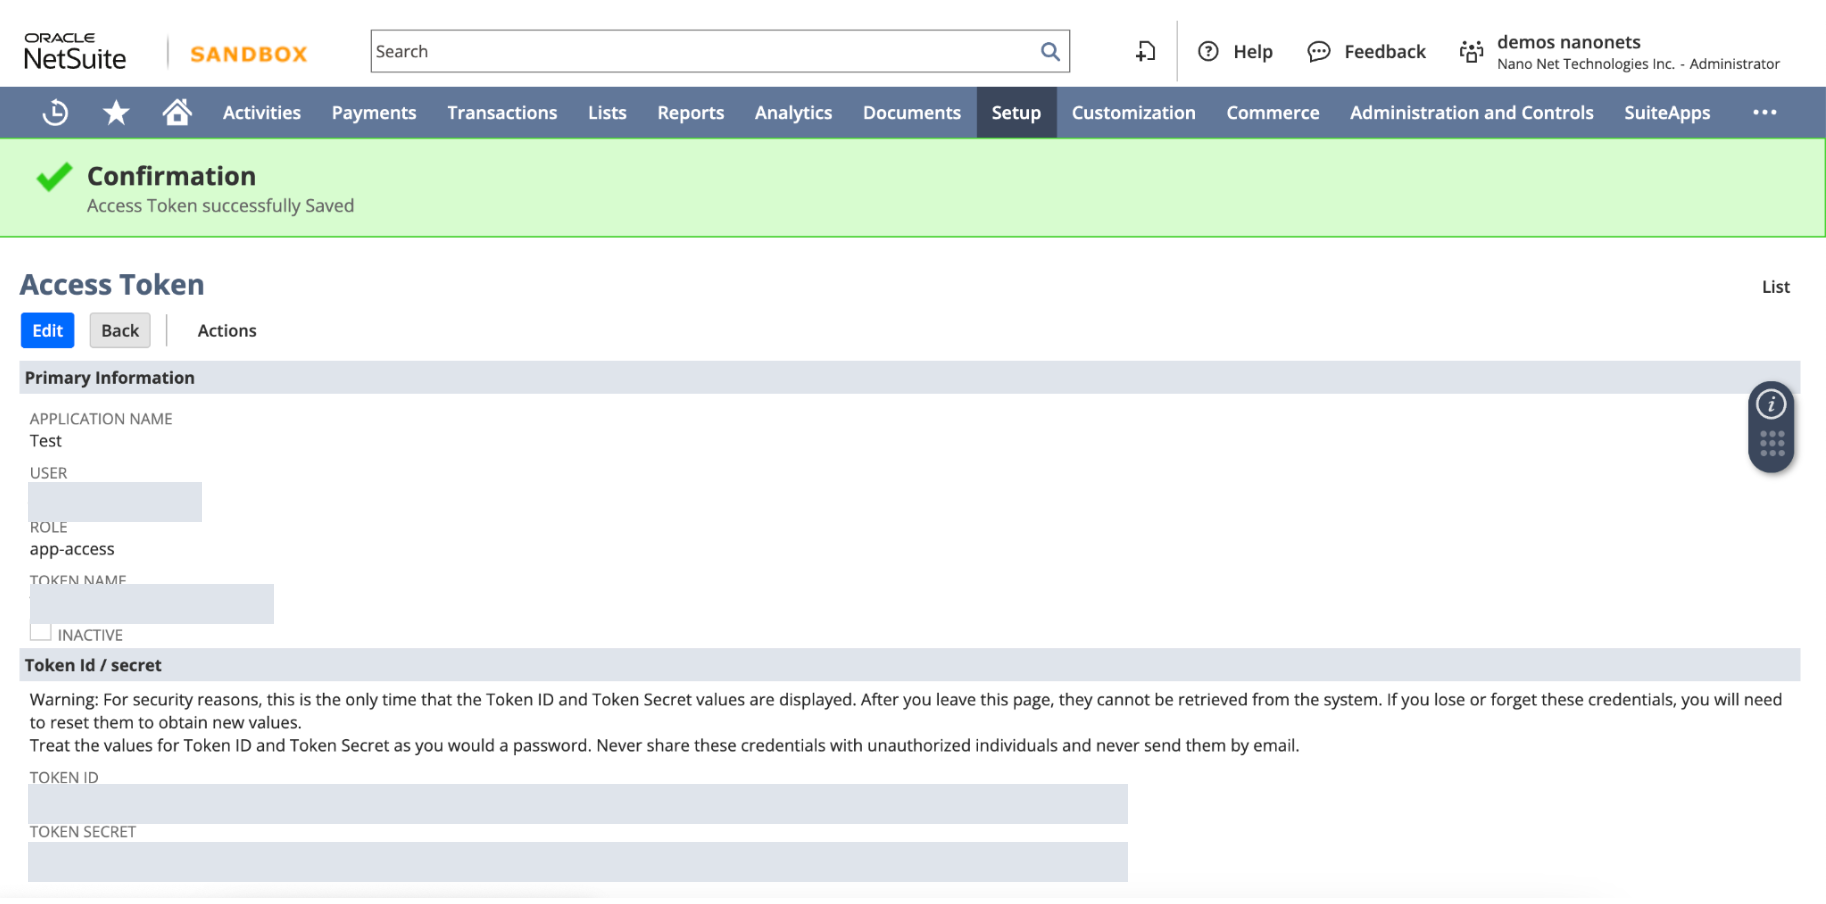
Set Up Token-Based Authentication (TBA):
- Navigate to Setup > Users/Roles > Access Tokens > New.
- Select the integration record you created, and generate the Token ID and Token Secret.
With your Account ID, Consumer Key, Consumer Secret, Token ID, and Token Secret, you’re now ready to make authenticated API calls to NetSuite.
Creating a Vendor Bill in NetSuite
NetSuite API allows you to create Vendor Bills programmatically, ensuring seamless integration between systems. Below is a step-by-step guide to creating a Vendor Bill using NetSuite’s REST API in python.
Let’s dive into creating both item-based and expense-based vendor bills using Python and NetSuite’s REST API.
Authentication
Before making any API calls to NetSuite, you need to authenticate using OAuth 1.0. The following Python code uses the requests_oauthlib library to authenticate the request using your consumer_key, consumer_secret, token_key, and token_secret.
Here’s how you authenticate using OAuth 1.0:
import requests
from requests_oauthlib import OAuth1

# Authentication details
auth = OAuth1('consumer_key', 'consumer_secret', 'token_key', 'token_secret')
Once you’re authenticated, you’re ready to build your payloads.
Create Vendor Bill Payload
1. Item-Based Vendor Bill
If you’re billing for specific products or services, an item-based vendor bill is ideal. Here’s the payload structure for an item-based bill:
# Item-based Vendor Bill payload
item_payload = {
    "entity": {"id": "1234"},  # Vendor ID
    "trandate": "2024-09-01",  # Transaction Date
    "duedate": "2024-09-15",  # Due Date
    "currency": {"id": "1"},  # Currency ID (USD)
    "terms": {"id": "1"},  # Payment terms
    "item": [
        {
            "item": {"id": "5678"},  # Item ID
            "quantity": 10,  # Quantity of the item
            "rate": 20.00  # Unit price of the item
        }
    ],
    "memo": "Vendor Bill for office supplies"
}
2. Expense-Based Vendor Bill
For costs such as rent, utilities, or consulting fees, an expense-based vendor bill is more appropriate. Here’s the payload for an expense-based bill:
# Expense-based Vendor Bill payload
expense_payload = {
    "entity": {"id": "5678"},  # Vendor ID
    "trandate": "2024-09-01",  # Transaction Date
    "duedate": "2024-09-15",  # Due Date
    "currency": {"id": "1"},  # Currency ID (USD)
    "terms": {"id": "1"},  # Payment terms
    "expense": [
        {
            "account": {"id": "4000"},  # Expense account ID
            "amount": 500.00,  # Amount of the expense
            "memo": "Consulting services for August"  # Memo for the expense
        }
    ],
    "memo": "Vendor Bill for consulting services"
}
Send POST Request
Once the payload is created, the next step is to send a POST request to the NetSuite API using the authenticated session. Below is the function to handle the request:
def create_vendor_bill(auth, payload):
    url = "https://<account_id>.suitetalk.api.netsuite.com/services/rest/record/v1/vendorBill"

    headers = {"Content-Type": "application/json"}

    # Send POST request to create the vendor bill
    response = requests.post(url, json=payload, headers=headers, auth=auth)

    return response

# Send the vendor bill creation request
response = create_vendor_bill(auth, payload)URL: This is the NetSuite REST API endpoint for creating vendor bills. Replace <account_id> with your actual NetSuite account ID.
Response Handling
Once the POST request is made, the API returns a response. You should check the status of the response and handle it accordingly. If the bill is created successfully, the response will include details such as the Vendor Bill ID and status.
# Response Handling
if response.status_code == 200:
    print("Vendor Bill created successfully:", response.json())
else:
    print("Error creating Vendor Bill:", response.status_code, response.text)
Example of a Successful Response
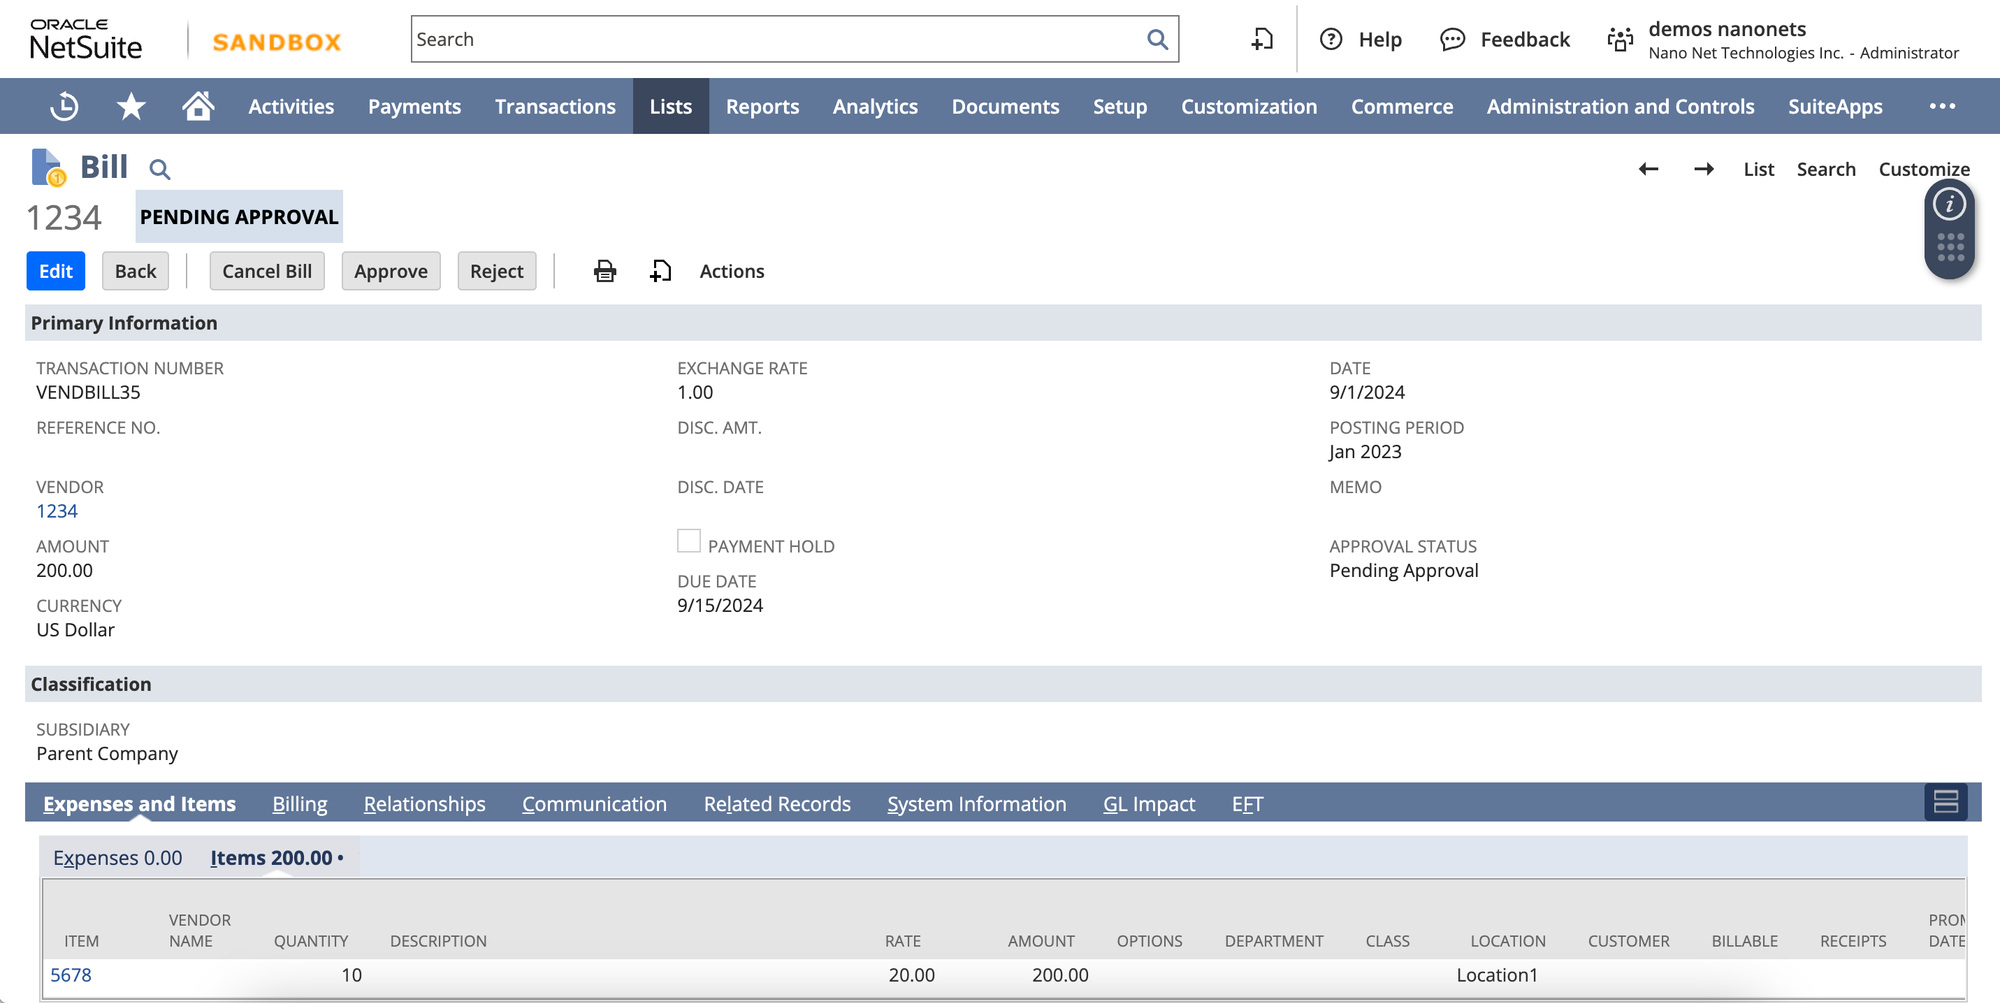
If the Vendor Bill is successfully created, the response may look like this:

Once the bill is created successfully it will show up in NetSuite dashboard like the below example.
Download Full Code:
The core code for posting a vendor bill using NetSuite remains consistent. However, the payload varies depending on the type of vendor bill being added. Let’s explore how to send a POST request to add various types of vendor bills using the NetSuite API.
How to Retrieve Internal IDs in NetSuite
To populate the necessary fields in the payloads (such as itemID, currencyID, termsID, and accountID), you’ll need to use NetSuite’s Internal IDs. These IDs correspond to specific entities, items, or terms within your NetSuite account.
You can find these internal IDs through the following steps:
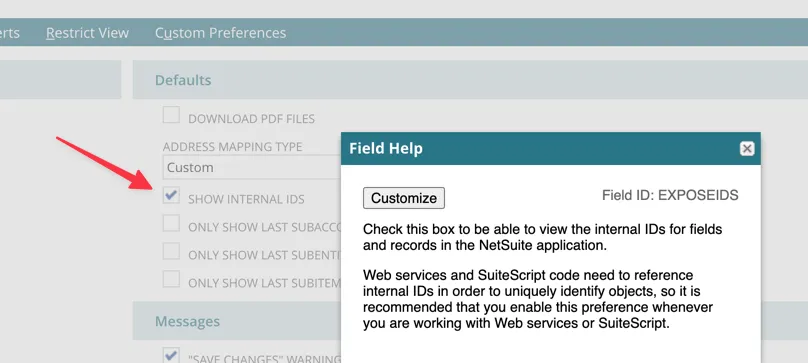
- NetSuite UI: Navigate to the relevant record (e.g., Vendor, Item, or Account) in the NetSuite dashboard and enable “Internal IDs” under
Home -> Set Preferences -> General -> Defaults -> Show Internal IDs.
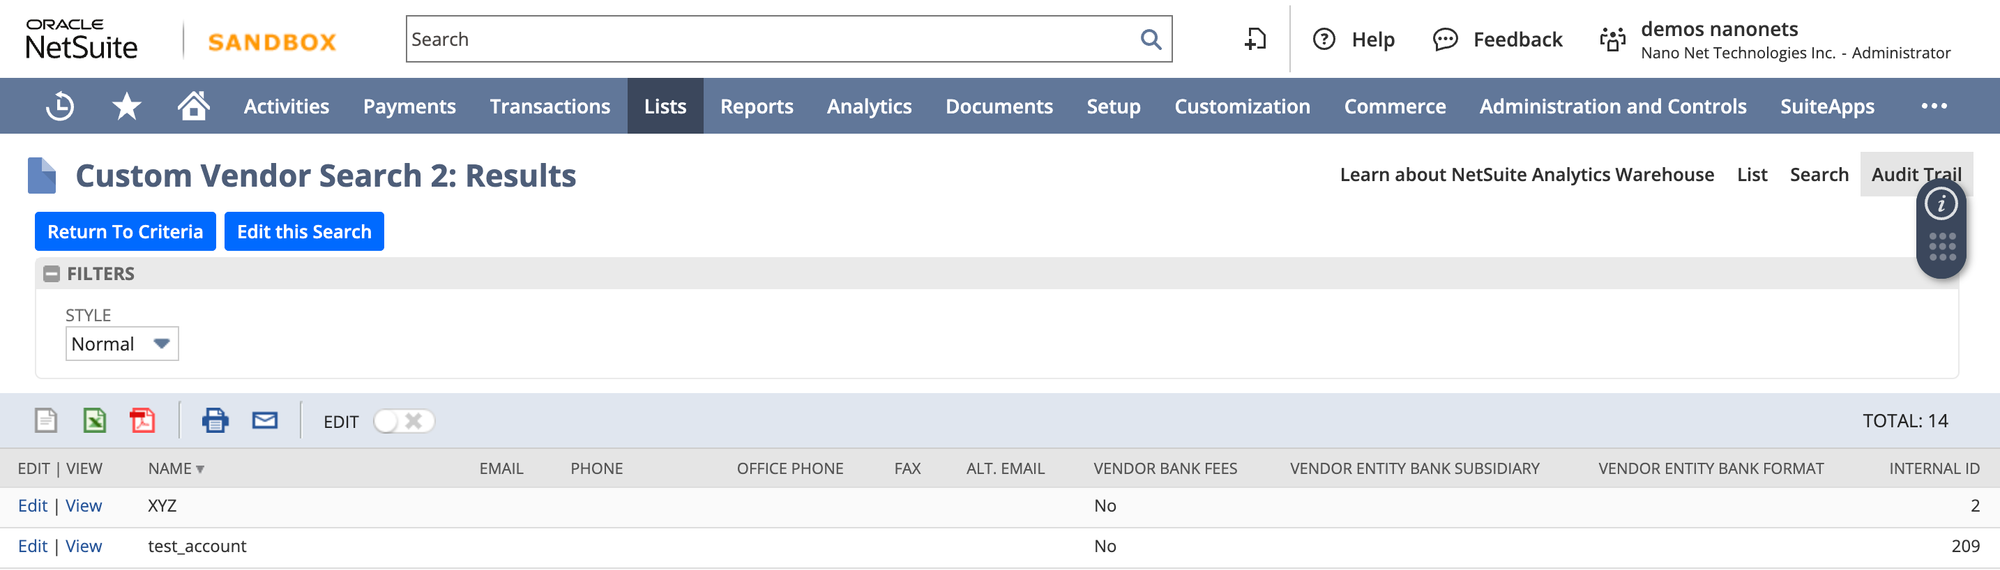
- Saved Searches: Navigate to Reports -> Saved Searches -> All Saved Searches in the NetSuite dashboard. Create a new search and select the relevant record type (e.g., Items, Vendors). In the Results tab, add the Internal ID field as a column. Running the search will display the internal IDs of the selected records in your results.
- SuiteScript: You can write and deploy a SuiteScript that retrieves internal IDs from records. After deploying the script, you can run it to access internal IDs for use in your API calls. Below an example of a simple SuiteScript to retrieve internal IDs of vendors:
/**
 * @NApiVersion 2.x
 * @NScriptType Suitelet
 */
define(['N/search'], function(search) {
    function onRequest(context) {
        var vendorSearch = search.create({
            type: search.Type.VENDOR,
            columns: ['internalid', 'entityid']  // internal ID and Vendor name
        });

        var searchResult = vendorSearch.run();
        var vendors = [];

        searchResult.each(function(result) {
            vendors.push({
                internalId: result.getValue({ name: 'internalid' }),
                vendorName: result.getValue({ name: 'entityid' })
            });
            return true;  // continue iteration
        });

        // Send back response as JSON
        context.response.write(JSON.stringify(vendors));
    }

    return {
        onRequest: onRequest
    };
});
With these internal IDs, you can ensure your API calls target the correct records, improving accuracy and efficiency in your vendor bill creation process.
Vendor Bill Payloads for Different Scenarios in NetSuite
When creating vendor bills in NetSuite, the type of expense you’re handling can vary, from multiple line items to recurring bills or applying discounts or credits. Below are JSON payload examples for these different scenarios.
Vendor Bills with Multiple Line Items
Vendor bills with multiple line allows you to specify several items, each with its own quantity and rate, and ensures that each item is recorded accurately.
Item-Based Vendor Bill Payload:
# Item-based Vendor Bill with multiple line items
item_payload = {
  "entity": {"id": "vendor_id"},
  "trandate": "2024-09-01",  # Transaction Date
  "account": {"id": "account_id"},  # Account ID
  "items": [
    {
      "item": {"id": "item_id_1"},  # Item 1 ID
      "quantity": 5,
      "rate": 50.00  # Unit price for Item 1
    },
    {
      "item": {"id": "item_id_2"},  # Item 2 ID
      "quantity": 3,
      "rate": 150.00  # Unit price for Item 2
    }
  ]
}
Expense-Based Vendor Bill Payload:
# Expense-based Vendor Bill with multiple line items
expense_payload = {
  "entity": {"id": "vendor_id"},
  "trandate": "2024-09-01",  # Transaction Date
  "account": {"id": "expense_account_id"},  # Expense account ID
  "expense": [
    {
      "account": {"id": "expense_account_1"},  # Expense account 1
      "amount": 250.00,  # Amount for first expense
      "memo": "Consulting services"
    },
    {
      "account": {"id": "expense_account_2"},  # Expense account 2
      "amount": 450.00,  # Amount for second expense
      "memo": "Legal services"
    }
  ]
}
This payload structure allows you to add several line items or expenses in one vendor bill.
Recurring Vendor Bills
Recurring vendor bills are ideal for handling regular, predictable expenses such as subscriptions or monthly services. The recurrence option ensures the bill generates automatically until a specified end date.
Item-Based Recurring Vendor Bill Payload:
# Item-based Recurring Vendor Bill payload
item_payload = {
  "entity": {"id": "vendor_id"},
  "tranDate": "2024-09-01",  # Start Date
  "account": {"id": "account_id"},  # Account ID
  "item": [
    {
      "item": {"id": "recurring_item_id"},  # Item ID
      "quantity": 1,
      "rate": 500.00  # Rate for the item
    }
  ],
  "recurrence": {
    "frequency": "monthly",  # Recurring frequency
    "endDate": "2024-12-01"  # End date of recurrence
  }
}
Expense-Based Recurring Vendor Bill Payload:
# Expense-based Recurring Vendor Bill payload
expense_payload = {
  "entity": {"id": "vendor_id"},
  "tranDate": "2024-09-01",  # Start Date
  "account": {"id": "expense_account_id"},  # Expense account ID
  "expense": [
    {
      "account": {"id": "recurring_expense_account_id"},  # Recurring expense account
      "amount": 600.00,  # Amount for the recurring expense
      "memo": "Monthly software subscription"
    }
  ],
  "recurrence": {
    "frequency": "monthly",  # Recurring frequency
    "endDate": "2024-12-01"  # End date of recurrence
  }
}
This ensures that vendor bills are generated each month until the end date, reducing the need for manual entries.
Applying Discounts or Credits to Vendor Bills
In cases where a vendor offers a discount or credit, you can easily reflect this in your vendor bill. Below are the payloads for both item-based and expense-based vendor bills with applied discounts.
Item-Based Vendor Bill with Discount Payload:
# Item-based Vendor Bill with discount
item_payload = {
  "entity": {"id": "vendor_id"},
  "tranDate": "2024-09-01",  # Transaction Date
  "account": {"id": "account_id"},  # Account ID
  "item": [
    {
      "item": {"id": "item_id"},  # Item ID
      "quantity": 1,
      "rate": 100.00,  # Original rate
      "discount": 10.00  # Discount applied
    }
  ]
}
Expense-Based Vendor Bill with Discount Payload:
# Expense-based Vendor Bill with discount
expense_payload = {
  "entity": {"id": "vendor_id"},
  "tranDate": "2024-09-01",  # Transaction Date
  "account": {"id": "expense_account_id"},  # Expense account ID
  "expense": [
    {
      "account": {"id": "expense_account_id"},  # Expense account ID
      "amount": 100.00,  # Original amount
      "memo": "Discount applied on services",
      "discount": 15.00  # Discount applied
    }
  ]
}
This setup lets you apply vendor-specific discounts to both item-based and expense-based bills.
Creating a Vendor Bill that Matches a Purchase Order
Matching a vendor bill to a purchase order ensures that your bill aligns with the terms of your PO. There are two primary methods to achieve this:
Match the Bill Line to the PO Line
This method is ideal when you want to partially bill the PO, matching specific line items on the vendor bill to corresponding lines in the purchase order. This is particularly useful for complex orders with multiple items, where some items may have been received or invoiced before others. When you use line-level matching, only the billed lines are updated, and the PO remains partially open for future billing.
payload = {
  "entity": {"id": "vendor_id"},
  "tranDate": "2024-09-01",
  "purchaseOrder": {"id": "purchase_order_id"},
  "item": [
    {
      "purchaseOrderLine": {"id": "po_line_id"},
      "quantity": 10,
      "rate": 50.00
    }
  ]
}
🗒️
Matching Bill line to PO line allows flexibility for future adjustments or additional billing against the remaining PO lines.
Transform the PO into a Vendor Bill
If the purchase order has been fully fulfilled and you’re ready to bill for all items, transforming the entire PO into a vendor bill is a quicker solution. However, this method fully closes the PO, marking it as fully billed. It cannot be edited later, so ensure that all items have been received and accounted for before proceeding with this approach.
payload = {
  "entity": {"id": "vendor_id"},
  "tranDate": "2024-09-01",
  "purchaseOrder": {"id": "purchase_order_id"}
}
🗒️
When transforming a PO into a vendor bill, the PO is locked and marked as fully billed. Use this method carefully to avoid prematurely closing a PO that may require additional adjustments.
Common Pitfalls and Troubleshooting
Creating vendor bills via the NetSuite API is a powerful way to automate your financial processes, but it comes with its challenges. Here are some common pitfalls and how to avoid them:
| Pitfall | Solution |
|---|---|
| Authentication Issues | Double-check your tokens, keys, and permissions. Ensure that Token-Based Authentication (TBA) is correctly set up. |
| Missing or Incorrect Fields | Always refer to the NetSuite API documentation to ensure all required fields are included and correctly formatted. |
| Data Synchronization Issues | Implement regular GET queries to verify that the data in your system matches what’s in NetSuite. Consider using middleware or an integration platform to maintain synchronization. |
| Rate Limits | Monitor your API usage and implement strategies like request batching or throttling to stay within limits. |
| Handling Partial Exports | Implement error handling and logging to identify and address partial exports promptly. |
Create Vendor Bill on Netsuite using Nanonets
Nanonets simplifies the process by handling the complexities of API authentication, scope management, and error handling, making it an ideal end-to-end NetSuite automation workflow provider. By leveraging the AI-powered Nanonets platform, you can automate the entire vendor bill creation process in NetSuite with minimal human intervention. This ensures faster processing times, improved accuracy, and seamless integration with your existing workflows.
Nanonets intelligently extracts key data from vendor invoices, maps it directly into NetSuite, and generates accurate vendor bills. Whether you’re dealing with complex line items, recurring bills, or expense-based entries, Nanonets handles it all with ease.
Here’s a demo video showing how you can set up automated Vendor Bill creation using Nanonets in under 3 minutes.
Nanonet’s Netsuite setup Demo
Advantages of Using Nanonets:
- Native NetSuite Connection: Handles all the intricate details like API authentication and missing fields.
- Out-of-the-Box Workflows: Simplifies tasks like vendor bill creation and PO matching.
- Accurate Data Extraction: Leverages Gen AI models to extract data from invoices and other documents.
- User and Data Management: Provides features like document storage and management and team collaboration.
- Approval Workflows: Allows for data verification within your team before posting to NetSuite.
By automating the vendor bill creation process with Nanonets, you can ensure efficiency, accuracy, and scalability in your accounts payable workflow, leaving the tedious tasks to AI.
For more information, check out the Nanonets documentation.
Nanonets automates vendor bill and PO entry into NetSuite, plus sets up seamless 2-way, 3-way, and 4-way matching in minutes!
Conclusion
Creating vendor bills in NetSuite using the API streamlines your accounts payable process, from handling multiple line items and recurring bills to applying discounts. By customizing payloads, businesses can automate vendor bill creation, reducing manual effort and errors.
But why stop at just manual API calls? Nanonets takes automation a step further. By harnessing AI, Nanonets automates the extraction and input of critical invoice data directly into NetSuite, saving you time and eliminating the risk of human error. Whether you need to create a simple item-based vendor bills or manage recurring expenses, Nanonets ensures the process is smooth, accurate, and scalable.